Tuesday, December 31, 2019

Making a Pizza Hut Thin 'n Crispy at Home


It's Go Time!

Many years ago I was in the Air Force stationed at Brooks Air Force Base in San Antonio. A few miles up the road at 1449 SW Military Highway Drive was an establishment named Colonna's Pizza owned by a man named Frank Colonna. Frank was the nephew of Frank Pepe, the owner of the famous Pepe's Pizza in New Haven, CT. Like myself, Frank was in the Air Force but about 15 years before me. He married a local girl, moved to New Haven, and then moved back to San Antonio (she didn't like being away from her family) and stayed in San Antonio. That's when he opened his own pizza restaurant.

I would frequent that restaurant with some guys from the base. It was a matter of time before Frank learned that, like himself, I was also from Connecticut. I made him nostalgic and he offered me a part time job.

Frank taught me that the dough is the secret to a great pizza. And his dough was awesome! Unfortunately I was too stupid to steal his dough recipe. And as great as his pizza was I was also nostalgic for the Pizza Hut Thin 'n Crispy that I discovered in my teens. And as years turned into decades I would strive to make a pizza that would make Frank Colonna proud of me. But a couple of years ago I decided that I wanted to make a pizza that replicated the taste of a Pizza Hut Thin 'n Crispy. So here we go...

Originally Pizza Hut only made the Thin 'n Crispy. While working at Colonna's Frank told me that Pizza Hut used baking powder instead of yeast. In the last few years I tried to verify this and could not. I even went so far as to email one of the founders of Pizza Hut. He never replied. Now there are some suggestions that pizza made with baking powder may exist in the central part of the US (Pizza Hut started in Wichita). On Cook's Country they featured a St. Louis style pizza made with baking powder. I followed the recipe, twice. It had some elements of Pizza Hut but I am all but convinced that Pizza Hut used yeast, not baking powder. This article, written by a guy who worked at Pizza Hut in 1980, is definitely worth reading.


These are the ingredients for the dough. A pizza dough can be made with as few as four ingredients (water, flour, salt, yeast) but I think that the original Pizza Hut Thin 'n Crispy also used an oil, perhaps shortening,

In this recipe I will use a food processor to mix the dough. You can also use a stand mixer (KitchenAid) or mix the dough by hand. For a batch this size a food processor works best. If using a stand mixer or mixing by hand I will leave it to you to adjust the technique, it's not hard.

The Dough: In the food processor bowl mix:
8.5 ounces flour
1 tablespoon butter, chopped
1 tablespoon oil (olive oil, grapeseed oil or a neutral oil such as sunflower or soybean)

Mix in the food processor until fully combined. Note that I use 2T of fat, one of oil and one of butter.
This is to give it a slightly pastry-like texture. Also there is something about the dairy in the butter that softens the dough and makes it easier to roll.

Then add:
5 ounces water
1/2 teaspoon table salt, or 3/4 teaspoon sea salt (sea salt is less dense, so you need more)
A "heavy" 1/2 teaspoon of yeast. That's what I use. Or, what the heck, just make it 3/4t. Or even 1 teaspoon. I don't care, the recipe doesn't much care either.

Mix all of the ingredients in the food processor for 20-30 seconds. It should all "pretty much" come together into a ball. If it's a little sloppy add a bit more flour, a little at a time.

This recipe provides dough for two 12" - 14" pizzas, each dough ball just under 7.5 ounces. The larger that you can roll the dough, the thinner and crispier the pizza will be.

The Sauce:
1 tablespoon dried oregano
1 tablespoon turbinado sugar (Sugar in the Raw) or honey or even (ech) white sugar
2 tablespoons oil. You can use any vegetable oil. I use olive oil though I doubt that Pizza Hut's high-margin budget would have permitted that.
15 ounce can of Kirkland Organic Tomato Sauce or nearest substitute

I mix the sauce as soon as I am finished forming the dough balls. That gives the ingredients more time to meld.

The Cheese:
To be authentic it would need to be mozzarella. Not fresh mozzarella - that was way too upscale for Pizza Hut. But as you start personalizing your own recipe you will probably start experimenting. Or using whatever cheese you have on hand. Two things about fresh mozzarella I should mention: (1) It makes for a delicious pizza. (2) It makes for a messy pizza. The extra moisture may leak from the pizza onto the stone which may make removing the pizza challenging. 

Building the Pizza:
Sprinkle a small amount of corn meal onto a pizza peel. After forming your dough ball into a 12" to 14" shell place it onto the peel. Add sauce, cheese and toppings. Slide the peel back and forth to make sure that the pizza slides. If the pizza is stuck lift the part of the pizza that is stuck and place corn meal beneath.

Then using a motion that will only get better with practice, slide your pizza off of the peel and onto the stone.

So How Did My Thin 'n Crispy Replica Turn Out?
Well the good news is that it was thin and crispy. The bad news is that it wasn't as authentic as I had hoped for. It was actually too good. That special and loveable "Thin 'n Crispy and a little bit o' Crappy" 🌝 of the original formula hasn't been mastered yet. But this is definitely close. 

Misc Notes:
Generally the stones are placed on the rack at its lowest position in the oven. You can experiment with that. Ultimately the goal is to balance "top heat" and "bottom heat" so that both sides of the pizza are done at the same time.

An extremely common mistake is to preheat the oven (say to 525) and as soon as the oven clicks off - thus indicating the temperature has been reached - the pizza is placed in the oven. What then follows is a horrible pizza. When the oven indicates that it is "at temperature" it means that the air in the oven it at temperature. The surface of the stone will be about 300 degrees. How to know when the stone is heated? Best is to use an IR temperature gun (this is what I use). Next best is to preheat the oven for an hour which all but guarantees the stone is at temp.

When mixing the dough for the first time you will probably have trouble telling when the flour-water ratio is correct. This comes with practice. A few options that I can provide - (1) take my pizza making class or (2) buy a pizza dough from the store and copy the texture or (3) err on the side of "too wet" rather than "too dry" and go from there.

One way to increase the flavor of the dough is slow fermentation. So if you want to throw your pizza in the oven at 6pm on Saturday you will want to make your dough on Friday and immediately throw it in the fridge. Then on Saturday at about 3pm move the dough to the warmest place in the house.

In my dough recipes I always use weight for the flour and water. Flour can have different moisture content and "puffiness" factors that makes measuring in cups unreliable. All bakers measure by weight. A digital scale is inexpensive and highly recommended. If you insisted on using measuring cups look up the conversion factors - you're on your own at that point.

I didn't mention how to get the pizza out of the oven. Most people use their peel. If you employ my cardboard peel technology that isn't advised. I actually - with my bare hands - pull the pizza off of the stone and onto a cool oven rack. If you don't have "hot hands" as I do you may want to consider a "real" purchased peel.

Many people forget to add salt. Don't know why, they just do. Even I have. That's why I taste my raw dough when I'm done mixing it.

The pictures below show the steps involved in making your first Thin 'n Crispy clone:

Roll each dough ball out on a counter. I do it in such a way that the dough ball has a belly button.
Place the dough balls into two containers, "belly button" side down to allow them to rise. Either cover the container with a sheet of plastic or place a locking cover on it. Be aware that the gases from the rising dough may blow the cover off and the cover will need to be reseated.

The sauce could not be easier. Olive oil, oregano, sugar (shown above) + a 15oz can of tomato sauce. I use Costco's brand with great results! Sugar shown is turbinado. Not from Pizza Hut's original recipe but I have had no white sugar in the house for 10 years. Mix ingredients until sugar is dissolved. Sauce does not need to be cooked.

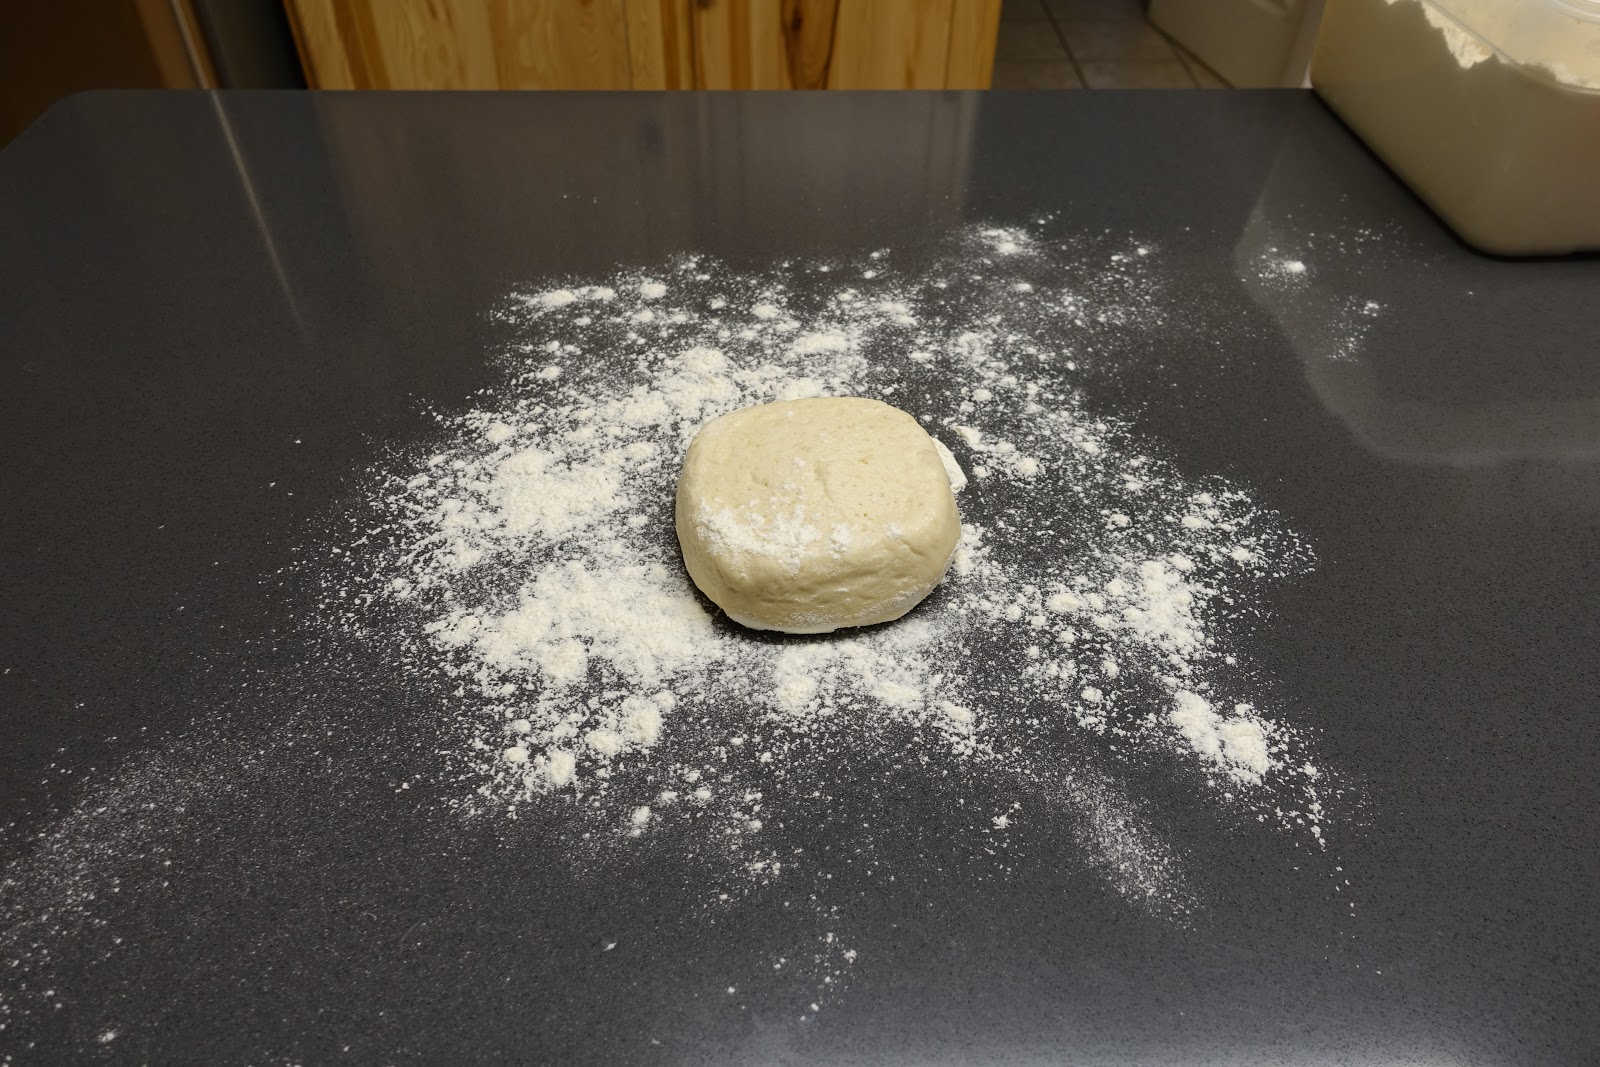
When the dough has doubled (+/-) in volume plop it onto the counter with flour. Work it into as large and thin a shell as you can create that will fit on your stone or steel.

I have tried all sorts of rollers. Tapered roller, roller with offset to emulate a dough sheeter and a flat roller. The flat roller works the best for me. The offset doesn't get the pizza thin enough and the tapered makes the center too thin and susceptible to rupture.
You will need a way to get your pizza into the oven. Many people buy a wooden or metal peel. Actually I use a sheet of cardboard that has moved close to 1,000 pizza over its 24 year life. 3-4 pizzas per month adds up! Also pictured is the tomato sauce that I use for my Thin 'n Crispy replica.

Top with mozzarella and your favorite ingredients. Here is pepperoni and sauteed portabella.

Place in oven using a pizza peel of your choosing. These stones were purchased from the garden department of Home Depot in the 1980's. About 35 years of continuous use. I also have a "pizza steel" not shown. You can Google "pizza steel" to learn more. I've gone back and forth, they work about the same for me.

After 4 to 7 minutes on a 525 degree pre-heated stone and this is what comes out! It is done when the edges begin to crisp.


Tuesday, March 12, 2019

Kitchen Upgrade - Lessons Learned

My kitchen was completely functional - in a 1983 kind of way

I am wrapping up a kitchen upgrade. This is being called an upgrade, not a remodel. I didn't redo the flooring, didn't poke holes in the walls for new windows, didn't have to deal with terms such as "load-bearing wall." It was all pretty straightforward - cabinets, counter tops, sink, some new lighting, a new range, a tiled backsplash and paint.

I also converted my electric range to gas, which necessitated running a gas line to the stove. Even though the house was built with a natural gas furnace and water heater no consideration was made for future use of a gas range. It required running a pipe from the basement into the garage, then up through the ceiling of the garage and through the floor of the kitchen to the back of the range.

In the end not much is really different. I was always happy in the kitchen, now I'm happier. The lighting is better, the countertops are awesome and cooking with gas is great. But the food tastes the same. A lot of money spent for food that tastes the same. Would I do it again? Yes, and fortunately not much would be done differently. I'll go through some of my decisions and experiences here.
At this point in the project I asked myself, "What the hell have I done?"

Cabinets

For the cabinets I went to Andredas Cabinetry, LLC of Scenery Hill, PA. Owner Craig Andredas runs the business that was passed down from his father. It is a professionally run operation employing both family members and skilled craftsmen.

After hours of poring over the options we decided to go with hickory cabinets with a clear coat finish. Despite that Craig says that 75% of his customers go with a "painted" wood I like wood to look like wood and have no regrets about the choice. I should also point out that Craig would answer my questions and explain current trends but never tried to push us in a direction that would go against his understanding of what we were looking for.

My favorite cabinet? The island. Craig built 8 drawers into it and it freed up so much cabinet space that I almost have too much room.


Gas Range

I think this whole kitchen update thing started out because a friend of mine had just converted from electric to gas. I had been wanting to do that for 20 years. I stalled on doing that because although our house had natural gas, it was only plumbed for heat and hot water. A gas line did not run to the range.

Another reason that I hesitated is that the first two plumbers I talked to would have run that flexible gas tubing. Although that meets code I wouldn't have felt comfortable with that. So I called the town's building inspector and asked if he could recommend a plumber who prefers to use steel pipe instead of flex tubing for routing natural gas. He gave me a couple of names. As a point of reference, the plumber charged $300 to run the gas line, parts and labor. It was an additional $200 for the electrician to run a dedicated line and breaker.

When I started looking at ranges I liked the "slide in" look. If you're not sure what's meant by a slide-in range follow this link.

Well the slide-in led to a new backsplash which led to new cabinets which led to new countertops and a new sink. The second picture in this post shows what we ended up not changing.

Our gas stove is located above the garage. The yellow wire - per manufacturer's spec - is for a dedicated 20 amp line for the gas range. I have no idea why it needs to be 20 amps.


Countertops

Even before you pick a countertop you need to make a decision - 4" backsplash built into the countertop, or no backsplash. If you go the "no backslpash" route then you will likely want to install a tile backsplash. That's the direction I went. Usually a little more work, usually a little more money but a modern look. Going with the 4" built-in backsplash - IMO - can make your kitchen look older.

 The most common choices for countertops are granite, concrete and quartz. I chose quartz because it is stain resistant (but not heat resistant). Also because quartz is manufactured you can get almost any look that you want. Granite is heat resistant but not stain resistant. Granite is also more resistant to scratches. So choose your poison.

First thing that might surprise some is that quartz is not made from 100% quartz (as is granite and concrete). Quartz countertops are about 90% quartz and 10% resin. For that reason they are not as hard as granite.

I believe that countertops are like cars - some cars have a color that hides dirt. But IMO when those cars are clean they look, ehhh. But those cars that are hard to keep clean, well when they are clean they look awesome. So let me just say this - when our countertop is clean it looks awesome.

Get a Countertop Doggie Bag

When you talk to your countertop fabricator ask if you can have some scraps left over from the job. That way if you have questions such as "will this stain my countertop" or "will this scratch it" you can easily test it. Then you'll know.

Asking for scrap pieces of  countertop allow you to test, "what if I..." Quartz is often described as nearly indestructible. You can see on the lower-left of this scrap piece that I was able to scratch it with a knife. Always use a cutting board. (this outdoor photo makes the quartz look lighter than it does indoors).


Bucking the Trend

I made a few decisions that weren't popular with current trends.

1. Painted Cabinets
You can call it solid stain, but if it looks like paint I'll call it paint. As mentioned above most people today choose a painted look, often white. That may be a trend. As for me I like wood to look like wood and I can't see a natural look ever being out of style.

2. Stick-Shift Faucets
I was urged to go with the trend of single handle faucets. I resisted and I'm glad I did. I looked at pictures of commercial kitchens and they are almost always two-handle, My kitchen is primarily about function and so I went with a bridge faucet where "left is hot, right is cold." Absolutely no regrets.


3. New Flooring
In a money-is-no-object world I would have got new floors. But they wouldn't have been that different from what I had. I would still have gone with ceramic tile.
The tile that I have in the kitchen - it extends into hallways and the bathroom and covers about 400 contiguous square feet. It is 20+ years old and is still perfect. Not a single crack, no wear and except for a little soil in the grout they are close to like-new. This is a 100 year floor and I chose not to change it.

4. Lighting
Once you're replacing cabinets, countertops and appliances the electrical work becomes cheap. Not really, but throwing in a thousand here and another thousand there doesn't seem to make the final cost change that much. It's already so big that it looks almost the same.

I added under-cabinet lighting. I had considered skipping on that but I'm so glad I didn't. The kitchen looks awesome at night with just the counter lighting on.

But where the electrician and I had religious differences was on my work light. In addition to the recessed lighting that you see in the bottom photo, I had a monster 5000 lumen,  4000K task light installed over the island. When prepping food it's the only way to fly. You can see it in the bottom photo, it is not turned on.

Incremental Design

If I had to pick out cabinets, hardware, countertops, wall colors, backsplash tile and grout on the same day I would have messed something up. I think it's almost impossible not to. On my first visit to the cabinet shop I picked out the wood (hickory) and made some hi-level design decisions. After a week of Interneting I revisited to refine the design, then chose the hardware. At that time I also selected the countertop.
Once the cabinets and countertops were installed I started shopping for the backsplash tile. I brought home several samples. I ended up with tile from "The Tile Shop" in Robinson, PA and it is actually 3" x 6" tumbled natural marble. "The Tile Shop" has a huge display, and you can purchase refundable samples to take home. Then once I decided on the tile I selected the grout. Yep, I said grout.

You Really, Really Don't Want To Screw Up The Grout

Why a separate section for grout? Can't grout just be lumped in with the backsplash? Not in my blog, it can't. Grout is a big deal. Grout is a huge deal! You can spend tens of thousands of dollars on a kitchen remodel and if the grout color is wrong the job is ruined. Eyes will be drawn to a bad color. Well that's simple, you think, pick out the right color.

There's at least two problems with that. First, holding up that little strip sample in the store next to the tile may look at lot different than the grout on the final install. Second, grout color can vary wildly. So the color on the sample can be quite a bit different than the color that you end up with.

To solve this problem I constructed a simple "tile and grout board" in a few minutes. I took a piece of plywood and glued on a few pieces of my chosen backsplash tile. I then bought and mixed colors to test. Yep, a small box of grout cost $10 - $15 and yep, you will likely be throwing some out. So you can choose to bypass this step. I would advise that you not do that.

Also you won't necessarily need to buy, for instance, several shades of gray. I bought a box of dark gray and a box of white and varied the mix ratios.


What I would have done different

Not much. I would have liked an outside vent for the gas range but it would have involved reworking and moving ductwork and plumbing. For that reason I should have probably got a gas range with an electric oven. Also IMO electric ovens make better pizza, which I make about twice a month. Having mentioned that, I'm struggling to come up with anything else that I would have done differently.

Last thing to get finished was the backsplash and that was two days before Thanksgiving. This picture was taken on Thanksgiving Eve, 2018. The bread on the counter was baked for the Thanksgiving holiday. Click on the picture for a bigger view.