Tuesday, July 31, 2018

Thin Crust Pizza - Part I


I miss Pizza Hut.

Now don't get me wrong. I am not saying that Pizza Hut is or was a great pizza. But in the early 1970's when there wasn't a pizza shop on every corner the Pizza Hut Thin 'n Crispy was my go-to pizza fix. But they still make a Thin 'n Crispy, so what is it that I'm missing?

It's not the same Pizza Hut that was started by two brothers in Wichita in 1958. In 1977 they sold the business to Pepsico and shortly after that is when I think the changes began.


I was such a regular that when the new menus came in the manager asked me if I'd like to keep an old one as a souvenir. Prices haven't changed much, have they? (circa 1972)


The non-pizza side of the menu. When I wasn't eating a Thin 'n Crispy I was lovin' the Cavatini Supreme. I was't a beer drinker in 1972. Too bad - 50 cents a glass.

Sometimes I feel that I don't know a thing about pizza. This is despite the fact that I have been to hundreds of pizza restaurants, own over 20 books on pizza, have made over a thousand pizzas at home and thousands more working in restaurants and have even attended pizza conventions in Las Vegas and New Orleans. And yet I'm always searching for the next pizza adventure, be it a nouveau twist or a nostalgic simplicity.

If there is one snooty clique that thinks they know everything about pizza, it is a society called the Vera Pizza Napoletana, or VPN. Here is a summary of their rules. They may seem strict, but they have actually loosened up over the years:

  1. Only use 00 flour
  2. Must use fresh cake yeast
  3. No rolling pin may be used
  4. Must use Italian grown San Marzano tomatoes
  5. Must use buffalo mozzarella
  6. Must take a somewhat pricey course to get certified
  7. Must be cooked in a wood burning oven. Gas ovens were later allowed under separate rules so that (my guess) they could sell more pricey courses
  8. No fats may be used in the dough
  9. The peel used to deliver the pizza into the oven must be wood or aluminum
  10. Oven must be at least 900 degrees and cook time may not exceed 90 seconds
Now many consider me a pizza snob. As such you might think that I would embrace these rules. I doubt that my Pizza Hut from the 70's followed many - if any - of these rules. And I - in my less snobby time - loved that pizza. I'm also sure that I could love it today. I will attempt to make a tasty - yet simple - thin crust pizza by breaking all ten of these rules. Here is my counter to these rules:
  1. I will use King Arthur's Bread flour. This flour is awesome for pizza.
  2. Will use Baker's Corner Fast Rising yeast which I purchased at Aldi for 79 cents for a 3-pack
  3. Pizza Hut used to run their dough through a sheeter. I will use a rolling pin to ensure my thin crust pizza is indeed thin. 
  4. Will use a can of canned tomato sauce - though not all canned sauces are the same.
  5. Will use packaged whole milk mozzarella. While I normally use fresh mozzarella in my pizzas my goal today is to imitate a legacy Pizza Hut thin crust pizza.
  6. My training exceeded the cost of getting certified if you consider all the restaurants I visited, all the books I read, the conferences I attended and the time I spent researching pizza. And after all that I'm not certified!
  7. I wish I had a wood burning oven. Pizza Hut used gas, I owned an electric oven, now I have gas. Both work. If your pizza doesn't come out to your liking don't blame the oven.
  8. I am sure that there was some fat in the Pizza Hut Thin 'n Crispy dough. I fear it was shortening. I never use shortening for anything, ever. My dough will contain a little fat, I'll talk about that in Part II.
  9. I have a peel made of neither wood nor aluminum that I've been using for over 20 years. More on that later.
  10. My oven will be set to 500 degrees. I'm giving it all she's got captain.

Flour, water, salt and yeast are all that's needed for a dough. I'm showing olive oil and I'll sneak in another fat in Part 2.


Four simple ingredients for the sauce - tomato sauce, oregano, olive oil and sugar


This post appeared with the help of Joe F. I had been spending my summer doing summer things. That did not make Joe F happy. He wanted another post, said it had been too long. So I tossed away a beautiful summer evening just so that I could get this out.

Parts of that previous paragraph are true.

In a few weeks (or sooner, depending on how much of a pain in the ass Joe F. is) in Part 2 of this article I will try to replicate the Thin 'n Crispy recipe.



Saturday, February 24, 2018

Do Dried Beans Go Bad?

I have a philosophy: "Given that there is an easy way and a hard way to do something, if the easy way was better there wouldn't be a hard way." That's why people who know me know that I never do anything the easy way. And so it is with dried beans. Why open a can when you can soak them overnight and cook them for two hours?

A few months ago I made my famous Bean and Pasta Italian soup. The Italian name is "pasta fagioli" but the American pronunciation is so stupid (pasta fazool, I've even heard say, "fazoo") that I refuse to play that game.

Anyway, this has been a can't-miss recipe for me. But a few months ago it disappointed me when some of the beans were crunchy. Not tooth-breaking crunchy, but they definitely had bite. WTF?

Quick background: What are the best beans? The healthiest? The most fiber? The tastiest? The answer is that I have no idea. Online information has often differed from the package info. So for the past several years - whatever it is I'm making - I mix five types of beans in a container and those are my beans. Doesn't matter what I'm making, if it's beans (lentils are different) that's what I use.

My translucent container doesn't photograph well but this is my 5-bean collection - kidney, great northern, black, pinto and navy.
Back to my fazoo. So I played with my soup and identified the smaller beans as the ones that tasted under-cooked. Those would be the navy beans. I searched online to see if navy beans had a reputation for being hard. Not really. Most cooks had no problem with navy beans but in one case I saw that someone suggested that their beans might be old.

Old? Really? These are dried beans. They could be used as gravel. They're hard when they're new. But I needed to get to the bottom of this. A test was needed.


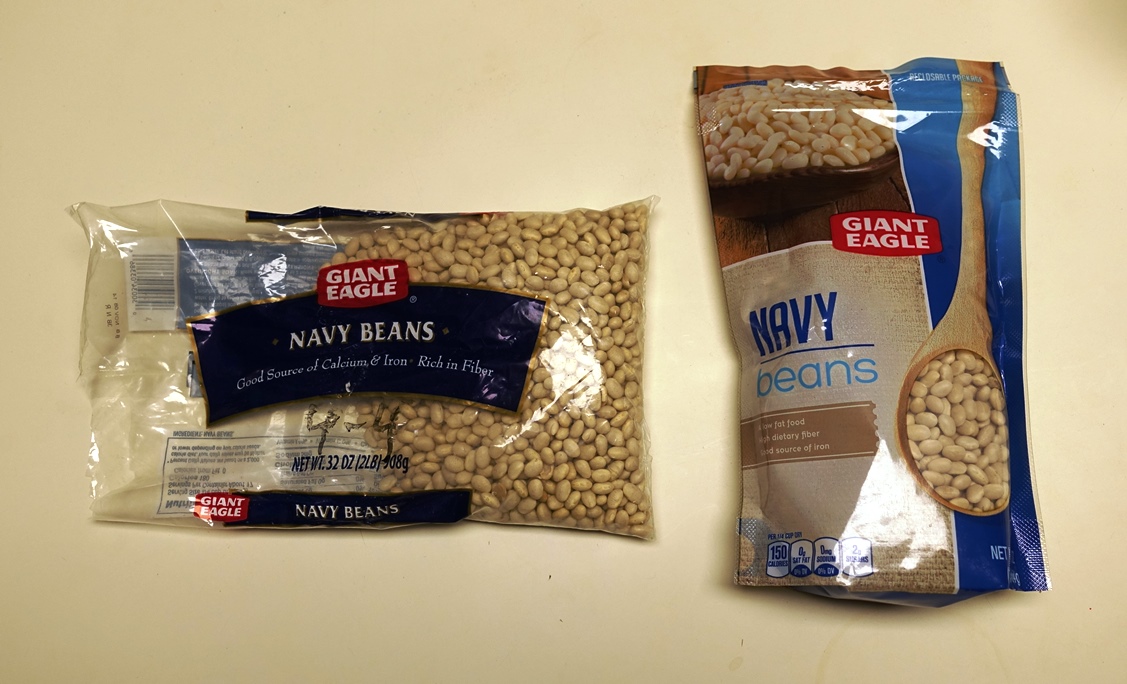
With a 2014 expiration date the beans on the left were probably bought in 2013. The beans on the right were bought on Tuesday. That's about a 5 year difference.
The plan was quite simple. Take new beans, take old beans. Soak them overnight. Cook them. See if they're different. Don't worry, I'll find some way to complicate this.

I put the beans in cups to prepare for overnight soaking. Whoa - the 2014 beans on the left look darker and old. Maybe age does make a difference.

One if the issues I struggled with was how to cook them identically? Cooked on the stove I would need two identical pans on two identical burners adjusted to exactly the same temperature to get the exact same slow boil. No, I wasn't willing to baby sits beans for two hours.

Then I thought about ways to cook the beans in the same pot, but being able to keep them separate. To do this I would make a cheesecloth "sack" for old and new beans and throw the sacks in the same pot. So I tried making one and decided against it. The beans in the center of the sack were surrounded by other beans instead of freely-moving water.

Finally I looked in the pantry and noticed that I had two nearly identical loaf pans, the only difference being a strip of high-temp automotive gasket sealer on one of the pans.

After soaking, the suggested cook time varies by source from 30 minutes to two hours. I went for two hours to give them every chance to cook through. The gasket sealer is from a bread-baking experiment that I'm not sure I want to share.

The cooking went off without a hitch. Once the beans had cooled a bit I tasted them. I went back and forth to make sure that I wasn't chewing on an "outlier bean" that was especially hard or soft. No doubt about it. The 2014 beans were harder. The 2019 beans were very soft, arguably overcooked. But no complaints from me. When cooking beans I will always err on the side of overcooking. There is nothing desirable about beans al dente.

The 2014 beans (left) and 2019 beans after cooking. The beans on the right look more tender, don't they? Not sure? More to come.
So I could end it there. Beans do get old, expiration date does matter, we can all go home now. But I wanted to create a visual. So I gathered up the apparatus shown below: A yardstick, a can of tuna, a heavy 28-ounce meat pounder, a cutting board and our beans.

To demonstrate the difference between the old beans and the new I dropped a meat pounder from a height of 1 3/8" on a cluster of the 2014 navy beans and the 2019 beans See below. The tuna can, standing 1 3/8" tall, was my height gauge.


When the meat pounder was dropped on the 2014 beans it nearly bounced off. But when dropped onto the fresh dried beans it mashed most of them.

So now I am a believer. This weekend I will toss any beans more than one-year old and will replace them. Then I will make sure that I rotate my stock. Nothing lasts forever, not even rock-hard navy beans.


Monday, December 4, 2017

"You Gonna Brush With That?" - A Look at Tomato Paste in a Tube


I started collecting cookbooks in the mid-1980's. Back then I bought mostly Italian cookbooks. That was before the Internet, Food TV, Whole Foods (as it exists today) and all of the easy accessibility to information and products that we now take for granted. And many of the recipes called for "double concentrated tomato paste" in a tube. Never heard of it except in those cookbooks, never saw it in Shop Rite or Stop & Shop and so I used tomato paste from a 6 ounce can. And my recipes came out fine. But I always wondered if I was missing something.

Well 30 years have passed and I saw this tube of Cento Tomato Paste in Costco. I thought it was a bit pricey but I sprung for it. I needed to try it. I studied the label. I compared it with the labels of other brands of canned tomato pastes. I tried it in recipes. I ate it out of the tube. I did not brush with it. Here's what I learned.

It is not double concentrated. It is more like 1.33x concentrated. I tried and tested the five cans of tomato paste shown below. They are all nearly identical in ingredients and nutritional content. I will compare the Cento to the Kirkland. Kirkland is the Costco brand. Since I bought them together in Costco I will test them together.

I purchased 5 cans to test. They ranged from 57 cents a can for Costco's Kirkland brand to 99 cents for Whole Foods 365 brand.
First question is how much "tomato product" is in the tube vs. the can? Is it double as the name suggests? This can be calculated by looking at the calories on the package. The Kirkland can has 30 calories per 33 grams. The Cento tube has 40 calories per 33 grams. Since the only caloric ingredient in either product is tomatoes, that tells us that there is about 1.33x more tomato for equal mass of tube vs paste.

Next look at the package size. The can is 6 ounces, the tube is 4.56 ounces. Interesting, take the 4.56 ounce tube and multiply it by 1.33 and you get almost exactly 6 ounces. That's right - the amount of "tomato product" in a tube is virtually identical to the can. One tube = one can!

How about the relative price. Cento was packaged as two tubes for $4.89, or $2.45 per tube. Kirkland cans were 12 for $6.79, or $0.57 per can. Since we've established that a can of paste and a tube of paste contain the same amount of tomato product, that makes the tube 2.45/0.57 or 4.3 times more expensive per tomato unit.

How about the taste? They both taste like tomato paste to me. The Cento may have been a tiny bit sweeter but that could have been because of the higher concentration. I doubt that I would be able to tell any difference in a recipe.

How about the convenience? Now we're getting somewhere. If you need only a 1/4 can of tomato paste you can just squirt out 1/4 of a tube (remember that a can and a tube have the same amount of tomato solids) and refrigerate what you don't use. The problem with that is that although you only used 1/4 of a tube, the tube costs 4.3x the price of a can. So you could have used 1/4 of a can and thrown out the rest and saved a few cents.

Once you open a can of tomato paste you are generally committed to using the whole can. Even covered with wrap my paste starts crusting after about a week in the refrigerator. Of course freezing what you don't use is always an option.

Or... you can freeze a can of paste overnight. Then the next day run the can under hot tap water for about 15 seconds. Then remove both lids and while using one of the lids as a pusher, push out the frozen mass of tomato paste. You can the slice what you need and save the rest in a zip-type plastic bag back in the freezer.

You can freeze a can of paste and extrude it out as a single piece to slice as needed.

I will tell you what is cool about the tube paste. It come in a soft metal tube - mostly tin, I think - just like toothpaste came back until the early 60's, I believe. It's not only nostalgic but once you squeeze the tube it stays squeezed.

I found that Whole Foods sells "(not) double concentrated" tomato paste. It is actually less expensive than the Cento that I bought in Costco. The Cento was $4.89 for two 4.56 ounce tubes. The 365 brand was $1.99 for a single 5.3 ounce tube. But the tube is 25 calories per 33 grams, the same as the 365 paste in a can. In other words, Whole foods is just squeezing 88% of a can of their tomato paste into a tube and charging twice as much. The "per tomato unit" price for the 365 is about the same as Cento.


So there you have it. For me, I'll use my tubes but I'm not planning to buy them again. I never saw Bobby Flay or Alton Brown use tomato paste in a tube. Also with freezing as an option I don't see a need to justify the expense. And although the Cento that I bought had a "best before" date that was almost two years away, I don't know if that date is equally valid if I open the tube today versus if I open it 18 months from today. I just don't know. I don't like not knowing!

Did you see that they now sell sour cream in a tube? To be continued.

Thursday, November 23, 2017

Authentic Italian Bread, My Ass!

It's Thanksgiving, and that means that I make my own bread for stuffing. I make the stuffing for a very large group, so I baked four loaves. But I still wasn't comfortable that would be enough. So because I was rushed and it was close I dashed down to Giant Eagle to pick up one more loaf of bread. It was a grab and run purchase. It was just bread - Italian bread - what could possibly go wrong?

Giant Eagle is a supermarket chain that, to me, seems to be popular with the Pittsburgh shoppers who are more concerned with convenience than quality. Every time I decide to give them another chance, they burn me. This time they got me on a loaf of bread. Intended for my stuffing, it ended up as bird food. Though the birds deserve better.

Is it just me? No. In this survey by Consumer Reports 68 supermarkets were rated based on criteria such as quality of meats and produce, price, courtesy and cleanliness. Giant Eagle ended up at #54 of 68. Of the stores available to Pittsburgh shoppers Trader Joe's was #3. Other top finishers were Costco (#6), Fresh Market (#9), Aldi (#14) and Whole Foods (#15).

When I saw "Authentic Italian Bread" I imagined a loaf being pounded out on a bakers table with "authentic" ingredients flying everywhere. But this is Giant Eagle. What was I thinking?

When I took the bread out of the bag, it had a very "unauthentic" feel. The loaf was anything but crusty. When I broke an end off of the loaf it had a "foam-like" appearance. Then I looked at the ingredients. Just a loaf of crap. Not in my cooking.

Check out that laundry list of authentic ingredients. "Artificial Flavor" - it must be authentic artificial flavor.
  
A second trip, this time to Whole Foods - and yes, for $1.30 more - I got an authentic loaf of bakery bread. Worth every penny


Sunday, September 3, 2017

Pizza On The Rocks

You gotta try stuff. The pictures go back 11 years (2006) to a project that I had all but forgotten about. It's not that it didn't work - in fact, it worked well. But like so many kitchen experiments the energy put in isn't always worth it.


A bag of River Rocks purchased at Home Depot were washed and placed in a 15-inch pizza pan


The pan and its rocks were heated to 500 degrees for an hour

I then built up a standard pizza on my pizza peel. Attention pizza snobs - that cardboard peel was created in 1995 and was in use for 11 years when this picture was taken. 11 more years have passed and it's still in use. At about 25 pizzas/year that peel has seen 500+ pizzas on it!

I slid the pizza onto the rocks. I don't remember how long it was on there but my guess is 6 or 7 minutes.

The 'za is looking pretty good. How does the bottom look?

Interesting, eh?
So here's the problem with all this. I was hoping for something special. You know, you try something different and see what happens. What happened in the case was that the pizza tasted exactly the same as if I cooked it on my standard pizza stone. OK, that's not bad, so why not keep doing it this way if only as a novelty? The problem was smoke. After each use a little cornmeal and maybe even a little cheese would fall onto the rocks. With no way to get it out short of a complete cleaning of the stones each session resulted in more "Crud on the rocks." Pleasant pizza aromas were displaced by a smell like something was burning - which it was! And so ended the great "Pizza on the Rocks, 2006" adventure.


Sunday, March 20, 2016

46 Connecticut Restaurants - How Many Surviving After 40 years?

On Oct 3, 1975 the (Meriden, CT) Record & Journal ran an insert in which they gave short descriptions of 46 restaurants. The link to that insert is here

So when I found this insert online in 2015 - 40 years after it was printed - my first question was, "How many of these places are still open?" Spoiler alert - only three.

In the insert each restaurant appeared twice. First there was a short, descriptive write-up such as this:


And then, presumably, each blurb required the restaurant to take out an ad, and that looked like this:


So I did a little research. I spent a few cold and gray weekends in the late winter of 2014/2015 researching these 46 restaurants. Beyond the fact that 43 were gone, why were they gone? Unfortunately the answers to that are hard to find. Some burned - at least one by arson. Some owners retired but most of the restaurants just quietly went away. And for a small number of them I found absolutely no online trace that they ever existed!


In my full-blown research I had links of interest such as Google Maps Street View of what a drive-by the restaurant would look like today. In this abbreviated version I left much of that out but I am trying to accomplish just two things, (1) show how few restaurants survive for four decades and (2) provide memories for those reading this that may be from Connecticut.

The three restaurants in bold font are still in business. The eight that are in italics are the only ones that I personally visited while residing in CT. I moved out of CT in 1994. Of the eight restaurants that I visited my three favorite were The Market Place, Millpond Taverne and Pumpernickel Pub - all long gone. Unfortunately of the three restaurants that still exist today, I never visited any of them. But on my next visit to CT I do plan to visit the Griswold Inn, which has been in business since 1776.

Here are the restaurants and by my best research the address at which they were (or are) located:


Anderson's Angus Corral Rt 1, Westbrook
Antonio's 672 Main Street, East Haven
Basel's 933 State Street, New Haven
Beechwood Manor 111 Scrub Oak Road, North Haven
Beefsteak Tavern 377 E Main St, Branford, CT 06405
Bernice's 446 Whitfield St, Guilford
John Brown's Wintonbury Mall, Bloomfield
Cabin Restaurant 106 Colony Street, Meriden
Café Lafayette 721 Boston Post Road, Madison
Captain's Table Guilford
Chello's 741 Boston Post Road, Guilford
China Wheel 2380 Dixwell Ave, Hamden
China Yum Meriden Mall
The Clark's North Street, Willimantic
Countryside Corral Chamberlain Hwy,Meriden
Dennis 906 North Colony Road, Wallingford
Debbie Wong 852 Washington St, Middletown
Edelweiss 980 Farmington Ave, West Hartford
El Torero 1698 Boston Post Rd, Milford
Gaetano's Restaurant 30 Quinnipiac Street, Wallingford
Griswold Inn 47 Main Street, Essex
Hawthorne Inn 2421 Wilber Cross Pky, Berlin
Hob-Nob Restaurant 44 Boston Post Road, Madison
Holiday Inn of Meriden 900 East Main Street, Meriden
The Inn at Cornfield Point Cornfield Point, Old Saybrook
Inn at Lake Waramaug  107 North Shore Road, New Preston
Idra Restaurant 1720 Dixwell Ave, Hamden
Jimmies of Savin Rock 5 Rock St, West Haven
Jimmies..in Hamden 2100 Dixwell Ave, Hamden
Last National Bank 752 Main Street, Hartford
Manor Inn 1636 Meriden-Waterbury Turnpike, Milldale
The Market Place Glen Lochen Mall, Glastonbury
Millpond Taverne 1565 Middletown Ave, Northford
New Top Hill 663 East Main Street, Meriden
Peking Inn 1052 South Colony Road, Wallingford
Phyllis' 12 Rock Street
Pine Valley Country Club 300 Welch Street, Southington
Poor Lads 204 Crown Street, New Haven
Pumpernickel Pub 53 Welles Street, Glastonbury (+other locations)   
Rustic Oak 165 Washington Ave, North Haven
Seamen's Inn 75 Greenmanville Ave., Mystic
Silvertown Restaurant S. Broad Street, Meriden
South Meriden House 1076 Hanover Road, Meriden
Three Bears Restaurant 79 Newtown Turnpike, Westport
Verdolini's 126 Hanover Street, Meriden
Wonder Bar 1726 Berlin Tpk, Berlin


Sunday, February 28, 2016

Perfect Ground Beef - Part 2 - Frying and Draining Ground Meat

What we're going to do:
Fry ground beef. Sound too simple? Read on and I'll show you an interesting and healthy twist.

Why it's important:
Will show a way that few people know about that allows you to drain the fat yet keep the flavor of the beef juice.

In Part 1 we showed how to select and grind your own beef. So at this point you have the best ground beef possible. You selected the cuts of meat, ground it yourself, and now you have the freshest, tastiest beef possible. Right?

OK, I understand. Not everyone has the equipment, the time or the motivation to grind their own meat. I get that. So if you're going to buy packaged meat at least put the odds in your favor by developing a plan...

  • For browning meat you need go no leaner than 85-15. For one thing once you go above that the price per pound of lean meat rises fast. As you will see later we will remove most of the fat so there is less need to pay an excessive premium for lean meat.
  • Buy meat ground in clear-see through packages that are wrapped in your local meat store or grocery. That rarely contains pink slime. Pink slime, a.k.a. lean finely textured beef is something that I totally avoid. Most ground beef that contains pink slime - at least to the extent that I'm aware of - comes in those prepackaged boxes that are in the frozen food section.
  • Is pink slime safe? Some say it is. I don't know if it's safe but:
    1.  I don't want ammonia gas in my meat
    2.  When people will add pink slime because they can, what else are they adding?

  • If you buy your ground beef in a store that doesn't have an in-house meat department the chances of it containing pink slime are higher.
  • Don't take the percentages (e.g., 85-15) that you see on the package as gospel truth. Look at the color of the meat as well as the package. The redder the color the leaner that the grind is. If meat packed in the same locale was packed on the same date and the color is the same I will bet you that the fat percentages are the same. I still won't know what the correct percentages are (and I suspect many of the meat packers don't know either) but I won't pay a premium for meat labeled 85-15 that is the same color as the 80-20. 
Get the show on the road - Let's brown the beef, rid the fat, save the flavor!

The pictures below will tell the story of how to brown meat in a way so that you can keep the flavor and get rid of that disgusting fat. I hope you find this useful.

Into some cooking oil place your ground meat. Here I am using a 50-50 blend of chuck and bottom round that I ground myself.
Brown the meat until it is almost to your level of doneness.

Crank the heat up to high. Add some water. For this one pound batch of meat I used about a half cup of water. Once the heat is high and it starts boiling stir like crazy to try and combine - if only momentarily - the water with the fat.
Once the water is boiling and you've stirred like mad, quickly drain the liquid from the pan into a clear, heatproof container. After sitting for a minute you can see the fat has risen to the top while the meat broth sits below.
This is the secret to flavorful, low-fat ground meat. Using a turkey baster remove the broth and return it to the pan. Discard the fat. Continue with your recipe for chili, tacos, sloppy joes - whatever!


---

Sunday, February 21, 2016

Hilton Head Vacation Restaurants, 2015

Almost every year I make a trip to South Carolina's lowcountry. This year, as we've done for the past several years, we stayed in Hilton Head Island (HHI). On the way back we passed through Myrtle Beach. Spent one night in Kinston, NC and passed through Raleigh, NC with Pittsburgh as the home destination. What follows is my food itinerary for the week.

I apologize for the scarcity of photos. In September when I ate at these places I had no idea that I'd have a food blog happening in a few months. Next year I'll do better with the camera.


Saturday

Lunch - Bucci's Italian Cuisine. Pizza was good, service was good and the outdoor seating was near the water but there was some intangible that left me a little unsettled. Maybe it was nothing more than travel fatigue.

Dinner - Java Burrito. Just a great place. It is similar to a Chipotle but with local charm and fresh, local ingredients.

The make line at Java Burrito

The beverage menu at Java Burrito. Yes, that is OJ for just $1.00. Yes, that is Dom Perrignon for $225.

Sunday

Lunch - Salty Dog Cafe. A regular stop when in HHI. More for the tradition than for the food, which is perfectly average. With $12-$15 plates and sandwiches, a $6 toll to get there, plus tax and tip it is not bargain eats. Lunch for two sans alcohol, dessert and appetizers can easily push $50.

Dinner - It's Greek To Me. With so many places to eat on Hilton Head we don't get here every time. But the food is good with a fine selection of Greek specialties. The service has always been quick and friendly and the prices fair.

Monday

Lunch - Mellow Mushroom. Another regular stop when in HHI. It is great pizza in a sports bar setting. If you like quiet conversation go for a weekday lunch. If you like a loud sports bar go any other time.

Dinner - Harris Teeter. Don't feel like eating out and don't want to cook? Pick something up in Harris Teeter. It is a large upscale but not snooty supermarket with sandwiches and prepared hot food.
Tuesday

Lunch - Zoe's Kitchen. Fast Mediterranean food.

Dinner - A Lowcountry Backyard Restaurant. This was the undiscovered jewel of the trip. Great food great prices great people great setting. Get here before 6pm, it gets busy very early and the wait can easily be over an hour. Closed Sunday and Monday they are open for lunch between 11am and 3pm, then they open again for dinner at 4:30. I will be back!

Wednesday

Lunch - On the road north we stopped for a quick lunch at McDonald's in Myrtle Beach. Sorry, it happens.

Dinner - Arriving in Kinston, NC we had reservations at Chef & The Farmer. This was the highlight of the trip. This restaurant is featured in a PBS show called, "A Chef's Life." This restaurant is on some lists as one of the top 100 restaurants in the country. We spent $92 for food, soft drinks, tax and tip and left a little hungry. That's not to say that they're expensive or that the portions are small - this is a very fine restaurant. It's only that I wanted to keep our trip on budget by only spending $100 for dinner. Kinston also has a fine microbrewery, a distillery and several shops and stores.

The menu at the Chef & The Farmer changes daily. This menu is from September 16, 2015. The AF before the date stands for "After Fire." The restaurant was heavily damaged by fire in 2012.

Thursday

Lunch - Leaving Kinston at 8am, we arrived in Raleigh, NC at about 9:30am. I visited with a friend and had lunch downtown at the Daily Planet Cafe. An $8 sandwich could have fed two of me. Put enough money in the meter because when you're done eating you'll want to walk through a doorway and into the North Carolina Museum of Natural Sciences. It's free, but in my opinion it's too nice to be free. I was glad to leave a generous donation.

Dinner - Arrived home south of Pittsburgh at about 10pm. Pulled frozen pizza out of my freezer.


Monday, February 8, 2016

Perfect Ground Beef - Part I - Grinding Your Own Beef

What we're going to do:
Grind beef

Why it's important:
Because for equivalent cuts and grade of beef, beef that you grind yourself tastes better than store-bought ground beef, period.

Ground beef is used when making burgers, chili, sloppy Joe's, taco's, empanadas and meat loaf to name a few. In this part - Part I - I will show the simple process for grinding beef at home. In Part II I will show a secret to frying ground beef that few people know about. 

Let me say this upfront. This is not about saving money. On a good day grinding your own beef and buying hamburger will cost about the same. This is about creating a fresh, ground meat whose quality is better than 99% of anything you can find in a store.

So one might ask, "If I'm going to grind my own beef, what of beef should I buy?"

I am not a perfect human being. The fact is that I grind about 60% of my ground beef (40% of the time I am either lazy or running late).  I know of no "one perfect" cut of meat to grind. I'm not saying that what follows is the best choice for ground beef. What I am saying is that it's my choice.

My favorite blend to grind is a 50-50 mix of chuck and bottom round. My preference is on the lean side of the lean-fat spectrum. Chuck provides the fat, juiciness and flavor. Mixing that with the leaner bottom round contrasts that with a rich, beef taste.

That's my preference. Keep it simple. First time out start by buying only one cut of meat. Popular choices are chuck, sirloin and short rib. Chef Jacques Pepin uses brisket. The important thing is to not make it so complicated or expensive that you resort to buying the packaged stuff. Depending on your likes and pricing I'd say start with chuck or sirloin and see where that takes you.

There are, of course, the premium cuts of meat generally used for steaks and roasts. My favorite cut of beef is the rib eye. But running a boneless rib eye through the meat grinder is crazy! Or is it?

I recently (Jan 2016) picked up a boneless rib eye steak at Trader Joe's for $9.99 a pound. I would bet that in your area you can find a rib eye at that price, maybe better, especially on sale. But isn't turning a $10/pound steak into hamburger overkill? Consider this - If you make 8 ounce burgers that's 2 burgers for $5.00 each. Smaller but still respectably-large 5-ounce burgers would be $3.35 each. That isn't much above fast food pricing, yet this is a premium cut of meat. So while it might not be your everyday grind it might be a nice occasional indulgence.

Anyway, back to the grind. The process for grinding meat is pretty straightforward. If you don't already own one, you'll need to determine what kind of meat grinder is best for you. This article will help you decide. I have a Kitchenaid mixer so I use the Kitchenaid attachment. It comes with two metal plates. I use the larger plate for grinding meat. The smaller one tends to plug.


Here I start with four pounds of beef. On the left is the chuck and on the right is the bottom round. Note that the chuck seems to have a higher fat content. It does.


I cut the beef into strips so that it feeds into the meat grinder attachment. I will cube and reserve one pound for beef stew.

Not much to say about this...the beef strips go in the top and the ground beef comes out of the front. Grinding three pounds of meat took me about two minutes. More time was spent trimming and slicing the meat.  Be sure to observe all the safety instructions for your grinder.


When you're done this is what three pounds of ground beef will look like. At this point it smells so fresh. 


Up until last year my sister lived in Connecticut. She took me to a restaurant in Glastonbury, Plan B Burger. Their claim to fame is that they grind their beef fresh - sometimes minutes before cooking it. If at all possible please plan to cook a burger with your fresh ground meat before you store or freeze it.

In Part II of this article I will demonstrate my method for browning ground beef. It is a technique that removes the fat yet keeps the tasty broth.


Sunday, January 10, 2016

Making Room in the Freezer

All Blogs need to begin somewhere. This one starts as a tale of two freezers - the one atop my refrigerator and the small one in the basement...

In June of 2013 I was having lunch at the Starlight Theatre and Cafe in Nantucket. They served what was nothing less than the best turkey sandwich I ever had. At that time I decided that as soon as I got home I was going to begin cleaning out my freezer and buy a turkey breast. I would then brine it and bake it and it would be delicious. Then I would perfect my bread recipe - which after 15 years is nowhere near perfect - and create the best bread to go with that.

It's now January of 2016 and I haven't even got past the point of defragging my freezer(s). So part of the reason that I started this blog is to embarrass myself into compliance.

Now there are some very good items in my freezer that should be there. The cans of orange juice concentrate should be there. The can of Old Bay should not. I hate Old Bay. But there I was one day, knowing full well that I didn't like Old Bay as I threw it into my shopping basket. I was making crab cakes and thought that maybe in the five years since I last had Old Bay I would have acquired a taste for it. Nope.

I also have four pounds of fresh ground turkey that I ground myself. It's an excellent food but it's in freezer #2, the small one in the basement and I keep forgetting what's in it. Then there's a package that has three chicken strips in it, a box with one Angus burger, about two dozen delicious meatballs that I made last month, and so on. The food is all good - and if it gets freezer burn I toss it - I just do a terrible job of managing my inventory. I hope to change that. This is my plan:


1. Until I get this under control buy only what I need. What this means is that if I need a half-pound of sausage for my Sausage, Shrimp and Quinoa recipe that I don't buy a one pound package and freeze the unused portion. It means that I go to the deli counter and buy 1/2 pound, period.

2. Don't overstock on sale items. It never fails. The frozen veggies go on sale and I buy 8 packages. I'm so smart. And by the time I've used three of them they're on sale again.

3. Plan on using freezer items at the start of the week. On Monday through Friday I usually get home after 6pm and so the meals are quick and simple - leftovers, sandwiches, pasta, Chipotle take-out, etc. On weekends I can spend more time in the kitchen. Regardless, I will try to use at least one freezer item every two days, more if possible.

4. Post a picture every two weeks. The intent is avoid visual evidence of personal failure. BTW if you think that the pictures don't look too bad - two things. (1) I put this project into high gear about three weeks ago and just now took the pictures and (2) trust me, it looks worse in 3-D.

My schedule is as follows: By April 1 the freezer should look much different and by June 1 I will have achieved my goal. Now if 4.5 months seems like a long time just remember that I've been at this for 2.5 years. In the time between now and then I will post other food-related stories.

And in June I will cook up that turkey breast - with homemade bread - and report on it.

Update - Feb 7, 2016

It looks like I lost some ground, especially upstairs. I took some baby back rib meat out of the freezer to use in a sauce. That's good. Then I put four containers of sauce in the freezer. That and some unauthorized frozen food purchases and here we are.
And so it goes.

Update - Oct 1, 2017

After trying and failing I developed a new strategy - it was to play a game that I called, "Hurricane." For every meal I pretended that the stores were closed and I had to prepare meals from something in the freezer. Did it work? See the captions under the pictures. I am not a proud boy!


Upstairs Freezer - Jan 10, 2016
Upstairs Freezer - Jan 24, 2016
Upstairs Freezer - Feb 7, 2016


Upstairs Freezer - Mar 20, 2016


Upstairs Freezer - Oct 1, 2017. I'm a loser. Couldn't do it. Had to buy more than I needed. It's actually worse that it looks. There are maybe 20-25 items in here that you don't see. Tiny packages of food - a sausage link, a few ounces of pulled pork, even a small amount of almond flour - that found its way into the freezer and worked it's way to the back.


Downstairs Freezer - Jan 10, 2016

Downstairs Freezer - Jan 24, 2016
Downstairs Freezer - Feb 7, 2016

Downstairs Freezer - Mar 20, 2016


Downstairs Freezer - Oct 1, 2017 - Total Failure. After kidding myself for almost 2 years that I was capable of clearing out the freezer I was wrong. Maybe public humiliation is what I needed. I will try one more time, dammit. Check back in four months.